
So, I had this great idea that I would work through some vintage tatting pattern books and blog about it. Maybe even write a book with updated patterns.
I don't know if I just happened to pick the hardest book to start with or they were just so much smarter in the mid-1800s, but this week was an epic fail. I was complaining to my daughter when she suggested that I write about my fails, as well as my successes. So here goes.
The premise
The book is "The Tatting Book" by Mlle. Riego, published in 1850. I found it at the Antique Pattern Library, and Google Books. It seems to be her first book on tatting. Her preface states that tatting individual pieces, then sewing them together as it had been done in the past, is currently making a revival in France under the name "frivolite". She didn't feel this method of work was practical for the "English lady", so she wanted to create a new method of work that would be suitable for English workers.
She sets up the book by describing how to make the stitches with a fine netting needle, instead of a shuttle, so that elements can be joined as the work is being completed. Well, who has fine netting needles anymore? I have some that I purchased for weaving shuttles, but it turned out the smallest ones were still too big to go through a picot (or pearl, as she calls them).
The pictures in the book gave me an idea, though. So I tried tatting with an embroidery needle. This actually worked pretty well, although two yards of thread weren't going to go very far, so there would be a lot of ends. Her practice pieces worked quite well with the netting shuttle, the embroidery needle, a tatting shuttle, and a tatting needle - I tried all four.

I thought, "Great! I can work these patterns with at least two of these methods, and write about them."
The problem
Boy, was I wrong. She immediately goes into a pattern that, while quite simple, has all sorts of problems.
The first row goes off just fine. Then we turn around with a tiny ring - again, no problem - and we continue by working overcast stitches over the thread in the space from the first row. In theory, no problem. In practice, I got all kinds of twisting and spacing issues.
An overcast stitch, which she refers us to her Point Lacet book for instructions, is basically the first half of a tatted double stitch, but it's worked with the shuttle thread. As any modern tatter knows, however, a series of half stitches makes a Josephine chain, and the stitches twist around the foundation. Her picture very clearly shows a straight row of stitching, so this is not supposed to happen.
The second problem I notice, is that the picture shows five rings worked into the picots of a single ring from the previous row. OK, but the ring in the first row had six picots, not five - so, typo.
Finally, the rings of the second row are not joined at all, so they all just float on the tops of the picots of the previous-row ring. And though I tried it three different times, with three different methods, the silly pieces won't lay flat.
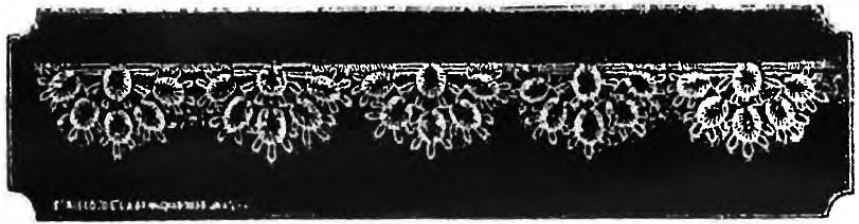
Here is the drawing from the book of what the pattern is supposed to look like:
Here are the results I got - first with the tatting needle:

And second, with the embroidery needle (remember, the stitches are still made on the thread, like shuttle tatting; I'm just using an embroidery needle in place of the shuttle):

Clearly I'm doing something wrong, but heavens if I can figure out what it is!
The Solution
A solution has eluded me right now. I may just table this book for now, or try a different pattern, but it does not appear to get easier. Any thoughts or comments from anyone else who has tried this?
UPDATE 3/27/2023: I have a theory that the spaces between the rings on the first row are not far enough apart, so I've started a collection of DIY picot gauges, and I will attempt the pattern again using a gauge between the first row rings. Also, the thread thickness may require more space between the rings than the pattern calls for (she recommends size 4 or 6 thread for finer work, or size 0 or 2 for coarser work; I'm using size 10). I also need to research some kind of comparison between thread sizes in the 1800s and thread sizes available now.
Comments
Post a Comment